Friday 24 October 2014

Automatic setting, P, Av, Tv, or M? 


Now most of the camera we buy is a digital camera. We can directly see what we put on a photo, and it's easy to use.   The most of us use the Automatic setting, and the camera then adjust itself.  
You do not have to think about diafragma, shutterspeed, and sharpnes or anything..... just click.. 
I use to be one of those persons that to make it easy, just left the camera on Automatic, and didn't look in to the other settings.  I was thinking it is to complicated, I will not manage, and it take to long.  This was excuses I was making to myself several times, until I finally took the step to change.

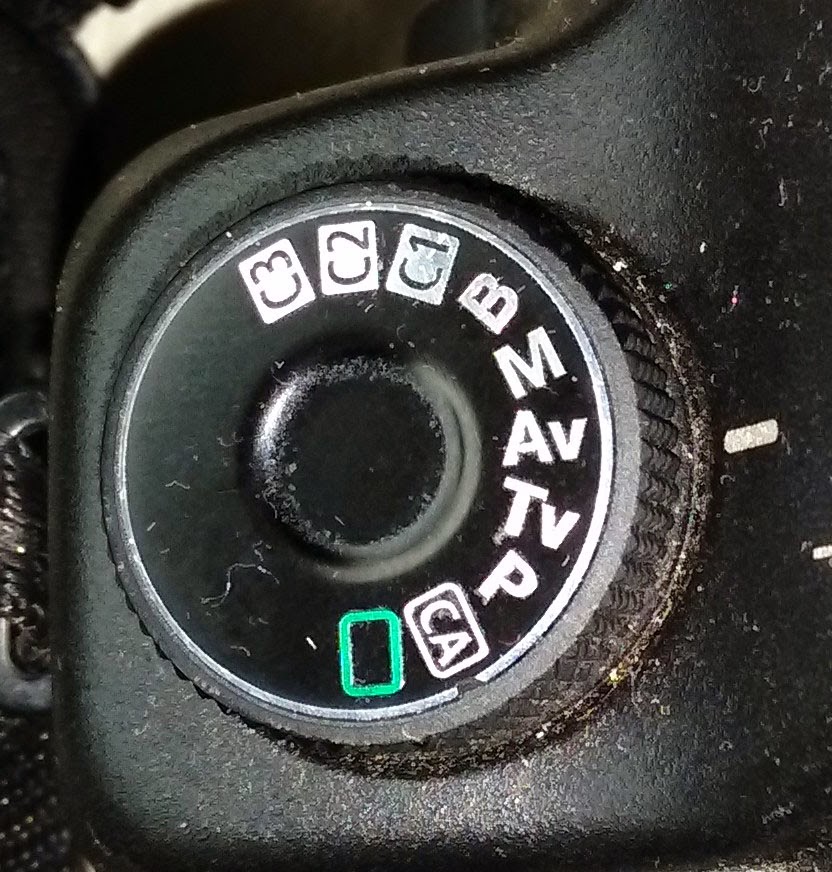
Here I give you some small information of what the diff.letters on the command dial means.  The following blogs will show what I learned about the different stands in practice, and how and when to use the settings.

Automatic (green rectangle in the photo above)

By using the Automatic setting, the camera will automatic choose all your camera settings. 

P (Program AE mode)
When you use P, you are able to change a few setting.  The camera will automatic pick all other settings that are needed for your picture, such as diafragma (apperture) and the shutter speed according to the basic program. 

TV (Shutter priority AE mode)
The camera will set the shutter speed for you.  You will have to choose the diafragma..

 AV (Aperture priority AE mode) 
The camera will set the diafragma for you. You will have to choose the shutter speed. 


M (Metered Manual mode)

You will have to set both the diafragma and the shutter speed completely manually.

B (Bulb)
In this mode the shutter will remain open for as long as you keep the shutter release button pressed down.
When you’re in P mode, your camera will show you which aperture and shutter speed settings it has decided to use for your picture. This can be really helpful when you don’t know much about manual settings. Instead of guessing which aperture and shutter combination will work in manual mode, you can shoot in P mode for a little while, take some notes, and then use the same settings in manual mode. You’ll get the same picture! - See more at: http://www.digital-photo-secrets.com/tip/993/your-cameras-settings-p-mode/#sthash.1cyegYMX.dpuf


Thursday 23 October 2014

Caught in a frame


Every picture we take are an item in a frame.  With framing we mean making a composition of the image.  Important objects or persons, positioning.  And here follows some tips regarding this.
This will help you in the beginning to see how the image will look before you see it on the LCD screen on your camera, or on the computer when you download the picture.  The benefit, is less cut and better results. .


To make this easy I will show you an easy way to practice this.  And to do so you will only need some cardboard/hard paper , glue or tape and a white and black rope/wire. 

We will create a  small box with an opening of 24 X 36 mm (= 2/3 ratio).
This corresponds to the dimensions of a negative with the usual photo size 10x15 cm. 
It applies to any type of camera. You can use astrong cardboard.
Furthermore, some wire, black for day shots, and white for night shots.
No we have reference to the strong lines and points (see below).
Lets start.................. 

The figure shows 2 frame, with the opening 24 x 36 mm. It is very important that you cut the correct hole.  We have made 2 so we can clue them together after having made the lines with the wire/rope.   
Vertical you make a line at 9 mm from the left and at 9 mm from the right (36: 4 = 9 mm).. This is 1/4 of the length. Horizontal (24: 3 = 8 mm), you make a line at 8 mm from the right and 8 mm from the left. This is 1/3 of the lenght. That marks the wires are glued with some sticky tape or glue.
Place the 2 cardboards over each other with tape or glue. If you make one for evening/night photography and one for daylight you would not have to change the colour of the wire/rope each time, but have both ready for any time of the day.


This is now the result, and you will see the strong lines, and the strong points where the lines are crossing each other.

How to use the diagram
With one eye closed, hold this infront of you. This give the effect of a zoom lens that zooms. If you bring the window/diagram closer to the eye, you can see the image as a classic or standard lens. By using it, you can place the camera directly in the right position and immediately select the best composition.
   

An example will make it more clear, and is applicable to any subject or image . In this landscape, is a classic mistake. The horizon line is placed in the middle of the picture! So it do not follow the rules of the strong lines and points.


If you now are viewing the image within the frame you see what other possibilities you get!
And as you see you can also use this vertically.
 Example 1                                                          Example 2
                

  Example 3                                                           Example  4